Taking pictures is my favorite part of creating blog posts and one of the main reasons why Instagram will still be my favorite platform despite its wacky algorithm. Lately I’ve been getting a lot of questions lately about my photos – what equipment I use and how I take them, so I figured it’d be easier share all the details with you guys here. Warning, long post ahead!
Table of Contents
- My photography equipment/tools
- My photography setup
- My go-to photo editing apps
- How I edit my photos in Photoshop
- Miscellaneous photography tips
My photography equipment/tools
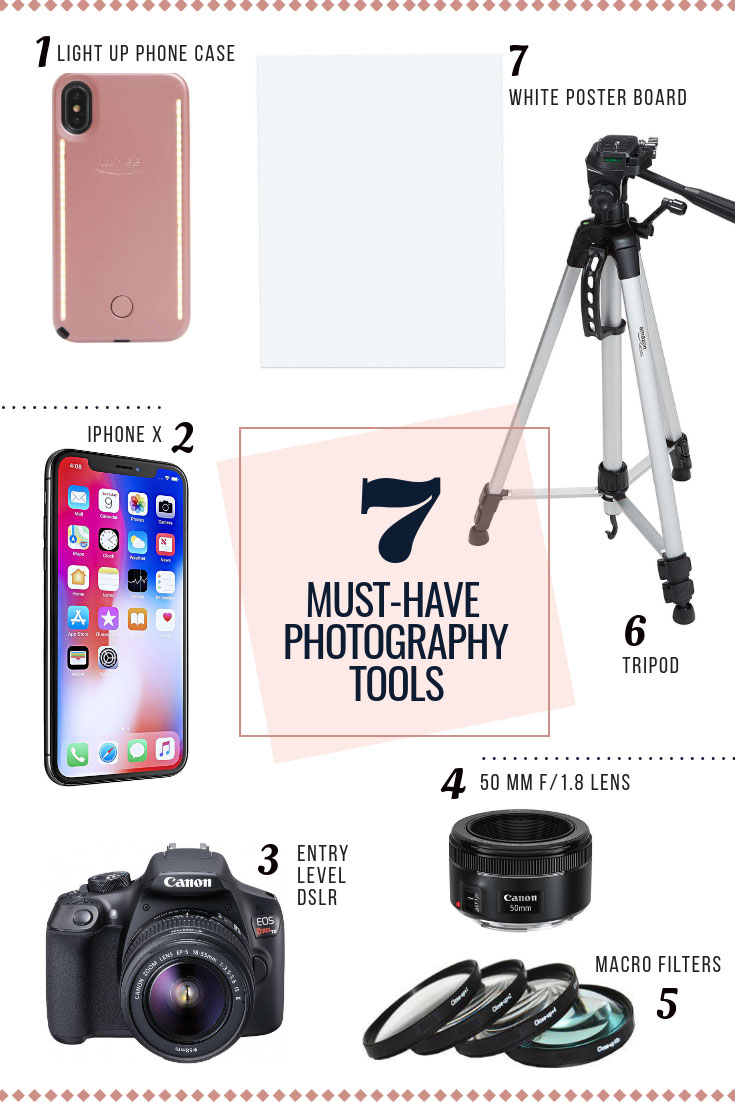
Illuminating iPhone Case*
I use my phone for 99% of my selfies, travel/style photos, and IG stories, and this LuMee case is a lifesaver in a non-existent lighting situation. It has duo lighting for both the front and back cameras, and you can adjust the brightness of the lighting with ease. I didn’t think I needed this until I started using it, but look at the difference with and without the LuMee:
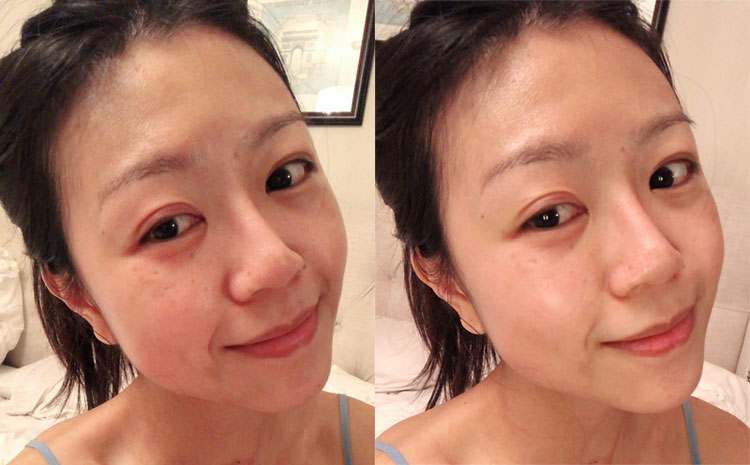
The lighting on the back is great for food photos in dark restaurants, but I think the front lighting is where this case really shines (pun totally unintended though I’m quite proud of myself for this). Game changer if you love taking selfies, but also awesome for retouching makeup on the go!
IPhone X
All my vacation, outdoor, and Instagram story photos are taken with this. Most smartphones nowadays have great cameras and are definitely worth the high cost!
Canon T3
Proof that you really don’t need a fancy DSLR to take decent pictures. I’ve had this for 6+ years and it still does a great job. If you want to invest, invest in lens, not the camera body.
50mm f/1.8 lens
The lens are what will really make a difference to your photos, and while some can go upwards of $1000+, this one is just $125. I never use the kit lens and always use this as it takes crisp images and has a large aperture (ie. low f-stop) so you can really get that bokeh effect! I typically shoot around 3.2-4.5 to keep my images sharp.
A tripod
A great tool for stabilizing your camera, especially if you plan to shoot with a slow shutter speed to let in more light. I’ll use this in low light settings when I need to decrease shutter speed.
Macro Filter Kit
For less tan $15 you get 4 filters that you can attach to your existing lens and they’ll allow you to really zoom in if you want to capture the fine details. I used to use the 2x for my hand swatch shots, but I’ve found my phone camera works just as well and is easier to shoot with. But for 10x zoom these will still work better.
White foam board
I use this for reflecting light, which gets rid of unflattering shadows and brighten the photo. You can find this in your local craft store for around just a few dollars.
I also have soft box lighting that I used to use in my earlier Instagram photos, but I’ve stopped because they just can’t compare to natural lighting. Plus they looked so bulky and ugly in my office :(
My photography setup
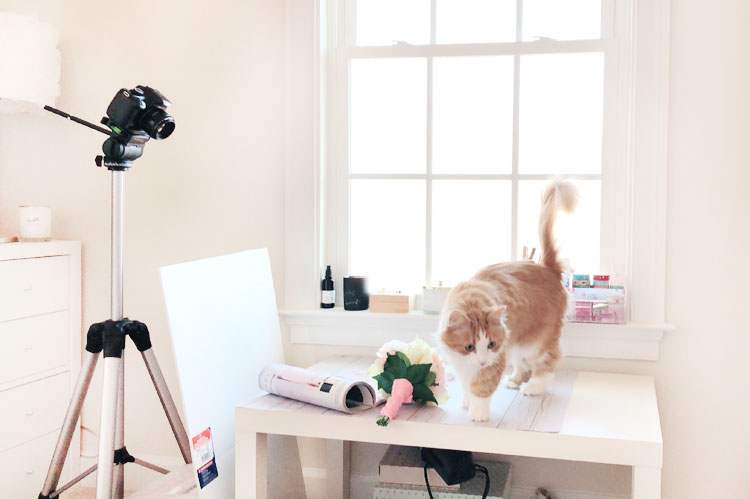
I take most of my pictures in my office in front of a large east facing window, so I try to shoot during my lunch break on weekdays to get a softer light. Ideally you want a north or south facing window as those give you soft light all day long, otherwise experiment taking photos at different times to see which results you like best.
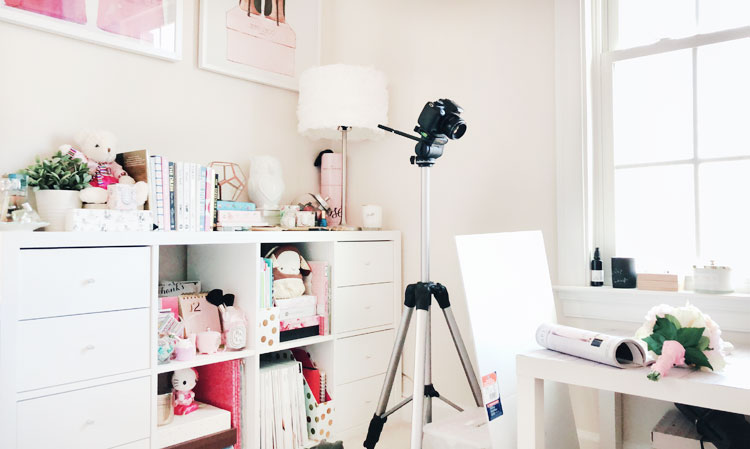
Most of my props are conveniently place either on the shelves or in a box, but often times I’ll also bring jewelry or piece from my bedroom as needed. For prop ideas I recommend reading: How to take better (blog) photos: props.
I also have a foldable stool in case I need to expand the tripod fully, because #shortpeopleproblems. The camera is placed perpendicular to the window rather than in front, otherwise I risk getting the ugly shadows associated with backlight. I usually position the foam board in front of the camera or across from the window depending on what gives the best result.
My top 5 photo editing apps
- Photoshop & Lightroom – For $9.99 I get both apps on my computer and my phone, plus 20gb of cloud storage! Previously I used Photoshop exclusively but I now do my final edits in Lightroom using my own custom presets. This helps give my images a cohesive look.
- Snapseed (iOS & Android) – A nice Lightroom alternative if you find the former too complicated. This app allows you to adjust the tone curve and the Selective tool is great for brightening up darker areas.
- Weather Underground (iOS & Android) – It has a “smart forecast” feature that will tell you the best times and days for photography based on your location! There’s no “indoor photography” preset, so I just used the “landscape photography” one and decreased the cloud cover setting. Now I know exactly which days to take pictures and plan accordingly.
- VSCO (iOS & Android) – My go-to for filters before I created my own in Lightroom. Theirs are really beautiful and natural, especially A6 and S3 which are both free. VSCO also has a nifty Skin Tone tool which is great for not only adjusting skin tones without changing the temperature of the entire photo, but it also be used to bring out the pinks in your photo:
How I edit my photos in Photoshop
This is more or less how I still edit my photos, though I do import it into Lightroom afterwards to apply my custom preset. Most of these edits can also be done in Lightroom as well, but I continue using Photoshop because of the Level and High Pass tools.
As promised, the before and after comparison:
Miscellaneous photography tips
- For blog photos I always use the Save For Web feature and set the quality to 60 to decrease the file size. The result looks almost as good as the original but at less than 1/3 of the file size. Always optimize your photos with Photoshop rather than an online image optimizer! The tradeoff between file size and quality is horrible with the latter.
- Always resize your photos in Photoshop. WordPress does have resizing features built in, but your image quality is going to suffer if you use their resized photos. Always pick “Full Size” when adding images to your post to prevent that! Also, if you use WordPress, make sure to turn off the Image Performance/CDN feature as that will also decrease your image quality.
- When shooting with a DSLR cap your ISO! I like to cap mine at 800, but basically this prevents the camera from using the highest possible ISO to compensate for low lighting. High ISO means pixelated photos, so I avoid it at all cost.
- Don’t use the lowest f-stop/highest aperture. I mentioned this briefly in the photography equipment section, but the lower f-stops (eg. 1.8 – 3) actually produce fuzzier images, and the difference is especially noticeable when you’re photographing text. You can still get a good bokeh effect with 4 or even 4.5, but you’ll want to go even higher if you want the most crisp text. This post has a more detailed rundown if you’re interested.
- Invest in spare camera batteries. Imagine finally getting that perfect lighting and setup…only to have your battery die and now you need to wait an hour (or more) while it recharges. Good lighting waits for no one!
- Turn on the grid in your camera. This is helpful for determining the composition of the square Instagram photos, but also the positioning of your subject. You want your feature subject to be placed where the grid lines intersect.
I hope you found this post helpful and if you have any questions let me know in the comments below and I’ll definitely get back to you!

This was a GREAT post! Made me feel like I could really take my owm stock photos! I’m gonna try it….test it out. But definitely informative. Thanks! Video was great too.
As a photography enthusiast I can really appreciate this post it’s fantastic! I love photography and these tips are very useful, thanks for sharing! LOVE a good Macro Lens!
Laura xo
http://www.shehearts.net
Love this post Jenny! I’ve been wondering how you always take consistently great, clean, and crisp photos! Thank you for also breaking this down in a way that anyone can understand! The video looks fantastic and its nice to hear your voice haha! Thank you for the incredible tips!
This is one of the most comprehensive posts about blog photography I’ve seen so far – LOVE it! Intrigued by your tip to not use the lowest f-stop, I always default to that for maximum background blur but I’ll try a couple different ones the next time I take blog photos!
A xx
alexisadrienne.net
Love this post and great tips. I’ve always love your photos, you do such a good job!
Sam Hodgett || Beauty & Lifestyle Bits
Any tips should be tried with a goal of making better photos! thank you dear!
Amazing post! Thanks for sharing all your wonderful tips. VSCO is always my go to but it’s good to read about other apps/ways to edit
Yasmin ????
The Sweet Seven Five
This guide is absolutely superb lovely, thank you so much for sharing! Also, I am sooo in love with your room and how you’ve decorated it. It’s so girly and pretty! Could you please please do a room tour at some point? :D <3 xoxo Thanks so much for sharing these tips! x
Kay
http://shoesandglitter.com
Aw thank you Kay, so happy to hear that you enjoyed it!! I’ve thought about doing a room tour before but I wasn’t sure if anyone was interested ???? I’ll definitely make a note to plan one now that you’ve requested it!
LOVING all your tips! I even learned a thing or two! This reminds me that I really need to invest in a spare battery lol. I keep saying this, but keep avoiding it. I need to check out my f stop and aperture to see if I can get a clearer photo! Typically I shoot pretty low. Now I feel like a bad photographer! Haha.
-Emily http://www.coatandcoffee.com
I already knew this post would be amazing and you haven’t failed to impress. Your photography is amongst my favourites so I will definitely be saving this post. Your tips are great and I’ll be checking out Snapseed as I take all my pictures and edit on my phone too xxx
I love love reading about blog photography tips. I feel like no matter how long you’ve been blogging there are always new tips to learn! Your post was so detailed & informative, I currently use photoshop express to edit my photos but I do plan to eventually migrate to photoshop.
http://www.themakeupaficionado.com
OMG your photos look so good! I have to agree on all your points. I’m just learning more about camera’s at work and I have been using a Canon 100 macro lens and it has been fun especially when I need that bokeh effect. I love Snapseed too especially the curves function!
http://annescribblesanddoodles.blogspot.com
I love this post, it’s so interesting to see people’s set-ups and what they use to take normal photos. Your photos are always flawless by the way, so this guide is literally perfect.
Have a good weekend :)
Amy;
Wandering Everywhere
So cool to see your setup Jenny! You have such a lovely office. Don’t be afraid of Lightroom though its so easy once you get the hang of it xx
violethollow.com
Oh my gosh your photography setup is so lovely – especially with the addition of the kitty cat, haha! Cute! 50mm lens is such an amazing and cost-friendly option, I love using it to shoot too, especially outfits :) Hope you’re having a wonderful weekend!
Gabrielle | A Glass Of Ice x
These tips were amazing! I really wish I could use the lens adaptors but I have an Olympus Pen so they wont fit sadly, the before and after photos look incredible xx
Gemma Etc. ❤️
High five, we use the same camera and lens :D I still need to get better tripod – I literally hate to take photos with tripod since I never know when it’s going to break. Vsco is amazing, but I’m so used to lightroom and photoshop. I use it only when I need to work on skin but meitu is also great for skin :) The grid helps a lot. Thanks for this post, I’m going to check macro filter and tripod :)
I love your photograhs, you have such a beautiful style and now I know why! You are practically a camera genius (I am so bad, I know nothing about my camera settings lol). Thank you for sharing your tips and I will do my homework now! xx
I LOVED this post! It was really interesting seeing how you do your photos, and wow you sound like a whizz at all this photography stuff. I think one day I would like to play around with photography more (outside of the blog too) but I just don’t have the time for now so I don’t want to buy a DSLR and for it to go to waste, but one day xx
Velvet Blush
Jenny, this post is a treasure trove for producing great photos. I need help in that area. LOL I am definitely saving this and will work on each point. You’ve brought up so many wonderful things. Amazing job on this!
http://www.averysweetblog.com/
This post is a gem!! Thanks for all the details.
Love the images you create.Will take the weeend to binge read on skincare :D
http://www.desiringsme.com/desiring-creative-direction/
Wow, that is so much work behind the scene, no wonder my pictures are so crappy in comparison to yours. HAHA! Mine is so simple, just on hardwood floor, in front of a window and edited using my MacBook Photo editing tools. I need to be better, I know that but what I’m doing now seems time consuming enough. :-(
Shireen⎜Reflection of Sanity
Thanks for sharing your tips. It is always useful to know and see if you can tweak things a bit. If only light was in ample supply naturally – then it would be so easy..ish!
franklyflawless.com
This was such a great post! Thank you for sharing all your secrets, I’m watching the video now and I’ve already learnt so much from you. I can’t wait to have a sunny day here so I can try out your tips. Your miscellaneous tips were especially handly, and I’ve bookmarked this page so I can reference it!
I loveee these tips!!! Thank so much for heaps of them!
xx Sofia | SOFIAADOT
Next time someone ask me how I take or edit my photos, I’ll give the link to this blog post instead :) I actually do and use majority of the things you mentioned here. Although in my phone, I alternate with VSCO and A Color Story App :)
xx Alyssa | STYLE VANITY
this was an AMAZING read, very complete guide and VERY helpful!!! I love snapseed for my pictures from my phone AND camera. My hubba has the iPhone X and sometimes I get super jealous of the camera! Thanks for sharing!
Jani from http://www.mylifeinmedicineblog.com
Funny I was just taking about these phone cases though not sure if they have them for my phone. Great tips and what a great space you have to shoot it, wish i had a space like this to shoot in.
Allie of ALLIENYC
http://www.allienyc.com
LuMee is available for iPhone 7 and newer and Samsung Galaxy, but there may be other brands available for other phone models. I used to shoot in my bedroom, basically anywhere with a window and good lighting works for me!
I have been debating off and on about getting an illuminating phone case and you totally made the argument for it! Taking photos for the blog are my least favorite thing, but I think that’s mostly because it’s easier for me to write. Whenever I sit down with my products to photograph, I’m not sure how I should line them up, and what props I want to use, and half the time they don’t turn out well anyway, but I guess that’s what learning is, right?
Sam / My Beauty Cloud
Lol the writing is definitely my least favorite part, I always put that off until the day before ???? With photos I feel like the more you take the more you start figuring out your unique style and what props/compositions work, it’s definitely a learning process!
I always have been a fan of your product pictures and editing skills! Can’t thank you enough for shelling out how you do what you do so perfectly! Is there any other iPhone that gives good quality pictures? iPhone X is kinda out of my budget for now.
Btw you have flawless skin, you look so beautiful without makeup even! I am in awe!
Hope you have an amazing weekend! :)
xx
Ankita
http://realgirltalks.com/2018/02/12/look-chic-sweatshirt-valentines-day-outfit-look/
Thank you so much Ankita! I’ve heard the iPhone 8/8 plus has a pretty good camera, and so does the Google Pixel. Basically you can’t go wrong with any of the more recent smartphones when it comes to their cameras, I just got the X because my carrier had a special ???? Hope you have a great weekend too!
I do a lot of the same things but I use my dining table to take my photos. I wish I had a dedicated table for that but I share a desk with my husband. NYC living y’know ;p I got an earlier version of the LuMee case from an Oprah event but I ended up giving it away because it was too bulky. The one you have looks more streamlined. The white balance tool is one of my BFFs in Photoshop LOL
Happy Lunar New Year to you and your family Jenny!
The table I use for photography was originally meant to for planner decorating, which I’ve long stopped doing, so I’m glad it was able to serve another purpose ???? The LuMee case wasn’t as bulky as I thought it’d be, especially considering that it has front and back lighting. Plus I like that the raised back keeps my lens from getting dirty!
Happy Lunar New Year to you as well, wishing you and your family all the best! ❤️
Wow, I love this detailed tutorial on how you get your photos and I LOVE the quality of your pictures. You definitely have an eye for making things look good!
xo, Emily | http://www.East91Blog.com
Thank you so much Emily! The more photos I take the more I figure out what my aesthetics are, it’s a continuous learning process ????
I love your photos – and these are fantastic tips! I find that my Pixel takes better photos than my Canon T3i now – especially for portraits!
http://www.sustainablysavvy.ca
Thank you Lindsey! I’ve heard so many great things about the Pixel camera, and I wish I could say the same with the iPhone X but I feel like my Canon T3 + 50mm lens still do a better job when it comes to flatlays ????
Thanks for sharing the editing skills! Those look great on the flat lays!
Raindrops of Sapphire
Thank you, I hope you found this post helpful!
Love love love this post!!! Especially love the “invest in spare batteries” tip. Nothing is worse than shooting and only being halfway done with a battery that is ALL the way done, lol
Laura
Black Coffee Beautiful
Thank you Laura, so glad to hear that! And omg I’ve ruined too many great lighting moments because my battery died, never again!
I need to watch the video later, can´t do it right now, but I am excited to see how you do it. I just got a new iPhone X and need to lay around with it a bit.
Anne|Linda, Libra, Loca
I was hoping to be able to take flatlay photos with the iPhone X as well, but I still prefer my camera in the end. I do love it for everything else though! Hope you like the video!
I really admire your talent of editing pictures, they look great! I’m quite a lazy person so my pics are basically raw haha
theclassynation.com
Thank you so much Natalia! I was just on your blog and your photos are lovely!
Ahh this post has been long waited for! Reading and watching your videos is like pornography for me… lol. I enjoy your tips very much and there is always something new although I work with Photoshop every day for artworks or photography. Well, I’m not a pro by any means. I use 4.5-5 f-stops for my photos, but I still have a problem when it comes to photographing text. On the screen it all looks okay until I resize the photo (almost at max, I’m a image quality freak!). I keep the quality very high when I save my images, but I guess my website template further resizes the images..
Gosh, I haven’t used the adjustment brush in ages. I’m in love with the Lightroom – you shouldn’t be intimidated at all! It’s so easy for organizing photos. I usually don’t tweak my images too much – I though of keeping things even more au naturel, but yours are also natural and far prettier than mine.. Maybe I should tweak them more! At least when it comes to IG photos I only add some exposure… Sigh. Anyway, I’ve always been a big fan of your distinguished photography style, composition and colors. And Cooper. I will save this post and re-read it when I’m in a rut! Sorry for the rambling, I need more coffee.
xx Laura / Laurantaina Beauty Blog
Aww thank you so much for the kind comment Laura!! I’m so glad you liked the post and video! I’ve never tried looking at my text at 100% zoom in Photoshop, my thinking is that if it looks ok once I’ve resized it for my blog, that’s fine by me! ???? And yes, I’d highly recommend turning off any resizing or optimization your blog/template tries to do. I definitely notice a difference when I use WordPress’ resized version, it looks horrible in comparison!
Your photos are stunning, and it’s even more impressive that you didn’t have to edit much to get such fantastic results! ????
Thanks for these tips. Explains why you have such cool pics. X
http://www.glitsxgrace.com/2018/02/15/11-home-made-natural-face-masks-to-try/
Thank you! I hope you found them helpful!
Jenny this is such a helpful post! I adore your photography style and photos, I think you’re doing a phenomenal job with your content. I have been looking for a tripod for a while now. I think I will go for the one you have, thank you for the recommendation. I will also find this post on Pinterest and save it.
~ Cat L.
http://www.CatsDailyLiving.com
Thank you so much for your kind words Cat, you’re such a supportive friend! Using a tripod has made such a different for my photos, I highly recommend it!
Happy Valentines Day!
Interesting to see how you go about taking your photos!
Thank you Megan, I hope you had a nice Valentine’s Day and found the tips helpful!